As of Software Version 2.51 the CLICK PLC can do up to eight simultaneous PID loops. And as usual CLICK makes it easy to do. But there is a lot to know about PID to get the most out of the CLICK PLC, so the videos shown below take you from novice to expert with short hands-on live tutorials that are easy to digest.
For each video, project files, excel spreadsheets, block diagrams, etc are included below each video for you to download and use.
– – – – – – DISCLAIMER – – – – – – –
THIS INFORMATION PROVIDED BY AUTOMATIONDIRECT.COM IS PROVIDED “AS IS” WITHOUT A GUARANTEE OF ANY KIND.
We do not guarantee that it is suitable for your particular application, nor do we assume any responsibility for it’s use in your application. It is provided solely as an example and it is incumbent upon the user to determine the applicability of information/code, and to fully test it prior to use.
QUICKSTART

Already familiar with PID? Then start here. We’ll do a quick example just to show you where to find everything and the workflow with without a lot of explanation.
> CLICK Project File for Quick Start Tutorial (Right Click, “Save As”)
1. OVERVIEW

This video outlines what we will be doing in this series of PID Tutorial Videos. It’s worth taking a few minutes to get a high level view before getting lost in the weeds …
> (no resources used in this video)
2. HARDWARE

Understanding your hardware is the first key to getting PID to work, so we’ll spend this entire video learning how all the pieces play together.
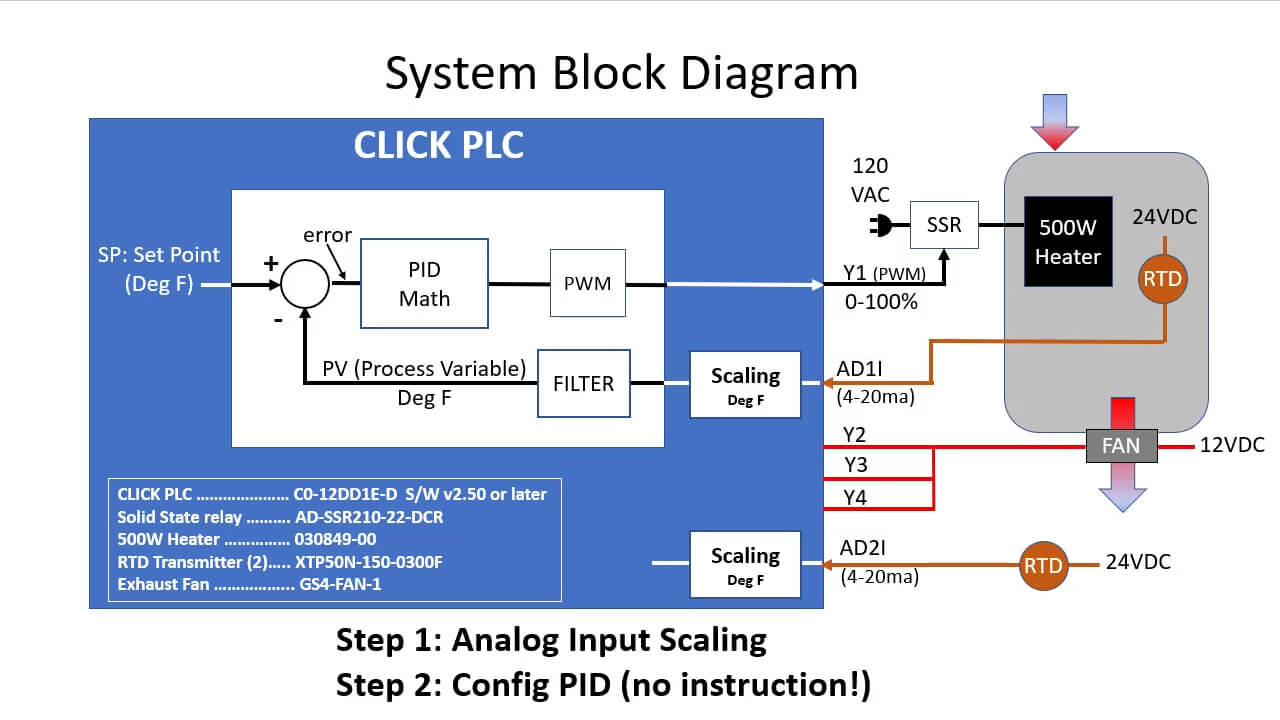
3. CONFIGURATION PART A & B


Learn how to configure the PID loop and to configure you hardware for PID.
> Project File: Configuration – Part 3A and Part 3B
4. AUTOTUNE


You COULD hit the Autotune button and hope things go well, OR you could follow these simple steps to ensure a solid Autotune.
5. MANUAL TUNE

Autotune in the CLICK is super reliable, but there are times when you might prefer to do it manually or you just want to validate the Autotune results. In those cases, it’s always a good idea to have a manual tuning method in your back pocket.
> Project File: (Same as Autotune)
> Spreadsheet: Blueprint Tuning
6. RAMP/SOAK

The CLICK PLC doesn’t have a Ramp/Soak function, so we use a simple brute force example in this video to show that PID can be driven by anything.
> Project File: Ramp/Soak – Note: This was created in a beta version of the software. Leave us a comment on YouTube if you find any incompatibility issues with it.
7. LOOSE ENDS

We had to gloss over or even skip a bunch of things to keep the previous videos from getting bogged down. In this video, we back up and re-visit those topics. There is a lot of really good stuff in here that will help you be a better PID programmer, so be sure to check it out!
> Project File: (none)
BONUS 1: HOW TO SELECT A FAN

Selecting the correct fan size is crucial to ensure PID has enough headroom to operate. But since it wasn’t really a Part of the PID tutorial, we broke it out into it’s own separate video.
> Project File: (Same as any of the above)
BONUS 2: FREEZE BIAS

COMING SOON: The previous videos focused on getting PID working on the CLICK PLC without going into any details about how PID actually works. In this video well examine how PID works and how Freeze Bias (anti-windup) helps the PID algorithm become more responsive.
> Project File: (Same as any of the above)
BONUS 3: C-MORE HMI PID NAMEPLATE

COMING SOON: Learn how to use the built-in C-more HMI template for viewing everything you need to know about how your CLICK PID system is working.
> CLICK and C-more Project Files
BONUS 4: C-MORE HMI PID NAMEPLATE PART 2

This video is a refresher on how to setup the Ethernet addressing and how to export the CLICK nicknames.