Recipes are used in a multitude of control applications including batch processing for the food, beverage, chemical and pharmaceutical industries, as well as complex applications such as robotics. Recipes, when used with an HMI, provide a simple and effective way to change the data in a large number of tags with the push of a single button.
The C-more touch panel has an advanced recipe function that allows operators to easily view and select from a list of multiple recipes. The operator simply touches a Call Recipe button on the screen, a Recipe Sheet pops up with a list of recipes, and the operator chooses which recipe to run. If configured so, the operator can even change values in a recipe from the HMI screen.
Recipe Database
The Recipe Database, found under the Database dropdown menu or Function tab, can store up to 99 user defined recipe sheets, with each recipe sheet configurable with up to 1,000 recipes. A single recipe can have up to 256 tags or values.
Creating a Recipe Sheet
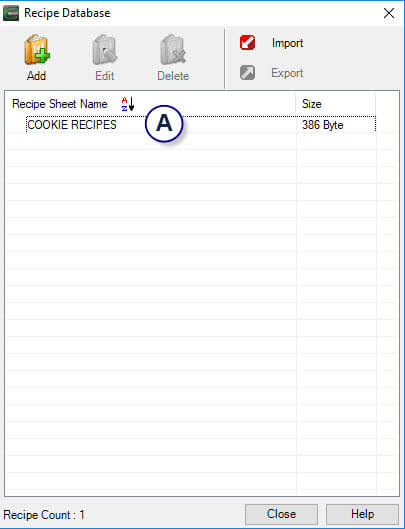
Figure 1
We will create a recipe sheet called “Cookie Recipes” (Figure 1, item A). When creating a recipe sheet, a spreadsheet style window is used (Figure 2). The first column in the sheet contains the recipe name destination tag (Figure 2, item A) and the names of the recipes.
In this example we are setting up cookie recipes, so we created a tag called COOKIE TYPE for our recipe tag name destination. The destination can be an internal C-more tag or a PLC tag using an ASCII String data type. We used a PLC tag so the PLC can track which cookie recipe is being used.
Below the COOKIE TYPE tag we listed our various cookies: Oatmeal, Sugar, Chocolate Chip and Peanut Butter. (Figure 2, item B) These names are static text and are not associated with any tags. When an operator selects and loads one of the cookie recipes (item B), the cookie name is loaded into the COOKIE TYPE tag (item A), which can be displayed on the C-more panel, or used for control or logging data in the PLC or panel.
Next we added the ingredient tags: Flour(Cups), Sugar(Cups), Eggs(Qty), and Walnuts(Cups) (Figure 2, item C). The ingredients are the destination tags where the values from the recipe are loaded. These are entered in the green cells at the top of each column. They can be Tag Names that were previously created in the Tag name Database, or a new Tag Name can be created by simply entering the desired Tag Name in a cell and a dialog box will open for configuration.
Since different cookie recipes typically call for different quantities of ingredients, we needed to list how many units of each ingredient are used for each cookie type. By right-clicking on a cell in one of the ingredient columns we can select the cell type as a value or a tag (Figure 2, item D). If selecting a value type cell, we enter a number that is within the range of the data format, such as BCD, decimal, etc. If a sugar cookie uses 12 cups of flour, we enter 12 in the flour cell for the sugar cookie recipe. The values will be written to the ingredient destination tags when an operator selects a cookie type and presses the LOAD button.
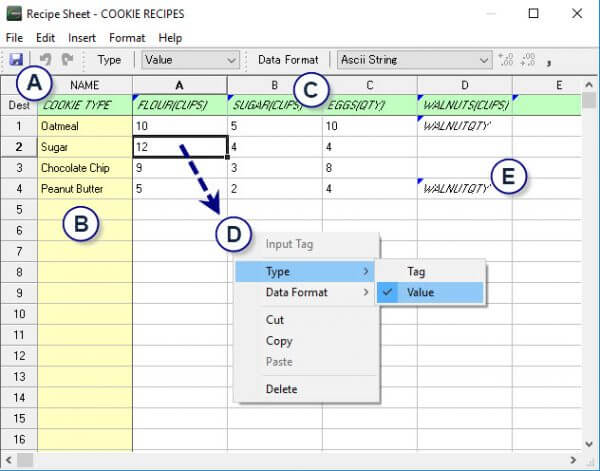
Figure 2
If using a tag type cell, we assign a tag name, such as WALNUT QTY (Figure 2, item E), and assign a PLC address. This way the PLC knows the amount of walnuts used for a specific cookie, such as Chocolate Chip cookies.
Some other facts to know about the recipe sheet are:
• A blue triangle in the upper left corner of a cell denotes the cell is a tag type, no triangle is a value type
• If incorrect data is entered in a cell it will be displayed in red
• The recipe sheet can be edited using drag and copy/autofill features similar to an Excel™ spreadsheet
• The recipe sheet can be exported to and imported from Excel as an XLS or CSV file for easy editing, using care to maintain the syntax and format, or a CSV file may be accessed through the C-more panel FTP server feature
Creating the Call Recipe Button Object

Figure 3
The Call Recipe button is used to display a specific recipe sheet on the panel (Figure 3). The button can be placed on one or more screens of a C-more panel. When an operator selects the button, the recipe sheet is displayed on the panel screen.
To configure the Call Recipe button, select it from the objects list. Enter the text to be displayed on the button (Figure 4, item A). We called ours “Select Cookie Recipe”. Next, select “Cookie Recipes” from the drop down list of Recipe Sheets (Figure 4, item B). To view and edit a recipe sheet, select the “Recipe Sheet” button (Figure 4, item C).
When configuring the Call Recipe button object, there are three types of sheets to choose from: Display Only, Display and Download, and Display, Download and Edit (Figure 4, item D). 1) Display Only will not allow any action from the operator. 2) Display and Download will allow the operator to select a recipe and load it into the destination tags. 3) The third type will allow the operator to edit the value in a cell that is to be written to a destination tag. Since we want to allow the operator to change the amount of ingredients in the recipes, we selected the third type.
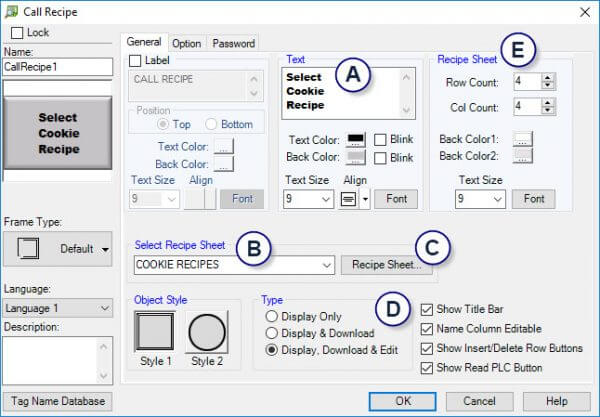
Figure 4
The Call Recipe button object also allows predetermination of how many recipe sheet columns and rows will be displayed on the panel screen (Figure 4, item E). Use the Simulate feature to test the project for the optimum display. In this case some of the ingredient names are rather long, therefore we will set the number of columns to four in order to view the entire name. We have four types of cookies, so we will select to display four rows.
Other features of the Call Recipe button include adjusting text size and changing fonts for the button text and for the recipe sheet text.
If preferred, a “Recipe Button” object can be used to load a single recipe from any recipe sheet.
Using the Recipe Function on the C-more Panel
Once the project is loaded into the panel, simply touch the “Select Cookie Recipe” button to display the recipe screen.
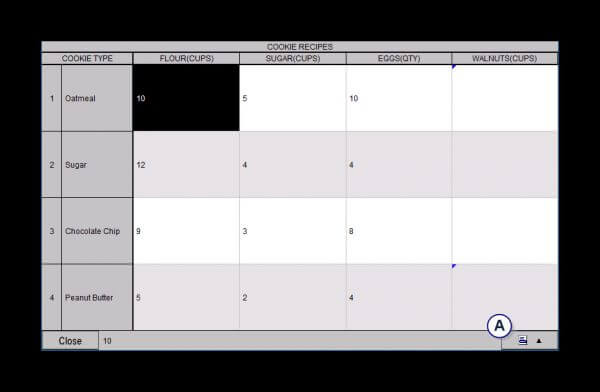
Figure 5
In order for the operator to access the recipe functions, they will need to open the toolbox by touching the button in the lower right corner of the screen (Figure 5, item A). The toolbox (Figure 6) will allow the operator to scroll through the recipe list, edit tags, and load the selected recipe into the destination tags.
To scroll through the recipes use the arrow buttons located on the toolbox (Figure 6, item A). To change the value in a recipe, select Edit, then select the cell to be edited and enter a value using the pop up keypad. To load the recipe, select the recipe name, such as Oatmeal, and press the Load button.
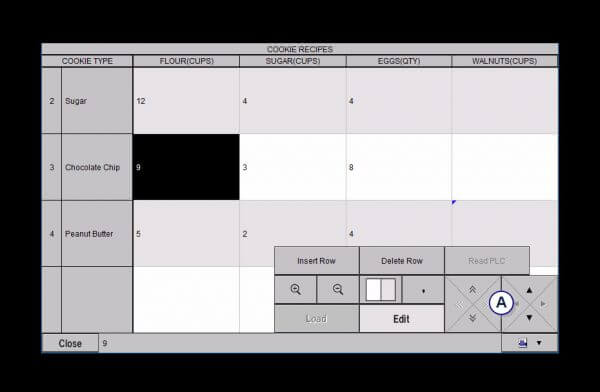
Figure 6
For further information on the Call Recipe object, reference the Help files included with the C-more programming software or download the latest Help file from:


