By now you know that CLICK PLCs are considered one of the easiest PLCs to use and the perfect choice for beginners and small applications. I know you know that, because I am one of the many who keeps bringing it up. As a technical marketer for AutomationDirect, my job is to let you know all about our PLCs and what they have to offer. But how about, for this article, instead of just telling you how easy the CLICK PLC is to use, I show you by actually using it in a DIY PLC project.
Sprouting an Idea
Now how do I go about doing that? Well, working for AutomationDirect has many perks and having access to the wide variety of control products, at employee prices, is definitely one of them. You’d think my whole house would be automated by now, but unfortunately it isn’t. In fact, I’ve actually been looking for a small controls project I could do with my son around the house. It’s time for him to learn how engineering and automation can be used and how fun it can be. At the moment, it’s early March here in north Atlanta and the days are starting to warm up a bit. With spring right around the corner, I started to think maybe he and I could build a garden box. But not just any ordinary garden box, one that’s automated – at least the watering part. This could be a win-win for everyone. I could introduce my son to automation while at the same time demonstrating the usefulness of CLICK PLCs. That settles it then, automated garden box it is!
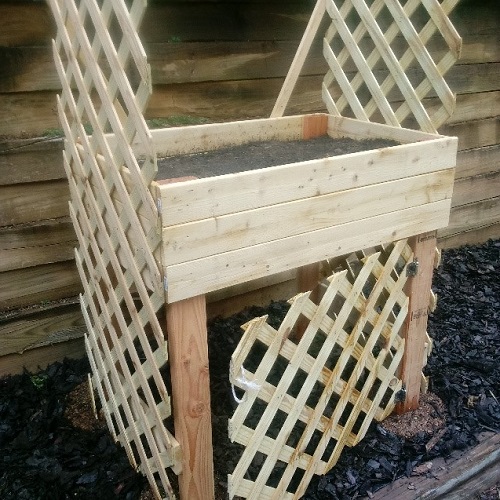
But what should we grow? After some discussion, we decided to grow cucumbers this year since you can never go wrong with a fresh cucumber salad, and pickles are always welcome in our home. So, with a few return trips to Home Depot, since I always underestimate what I need from there, some cutting and a little nail gunning, we had a 3’x2’ elevated garden box built – complete with new garden soil and lattices for the cucumber vines to stretch out on.

Getting control
With the garden box done, we now needed the controls. Like I mentioned earlier, we decided to automate the watering since the sun handles most of the work otherwise. To do this, we needed a reservoir of some kind, a pump, a switch or two, an enclosure, and a PLC. We decided on the CLICK PLC because in case you haven’t heard, the CLICK PLC is considered one of the easiest PLCs to use and the perfect choice for beginners and small applications. Hey, I’m just doing my job 😊!
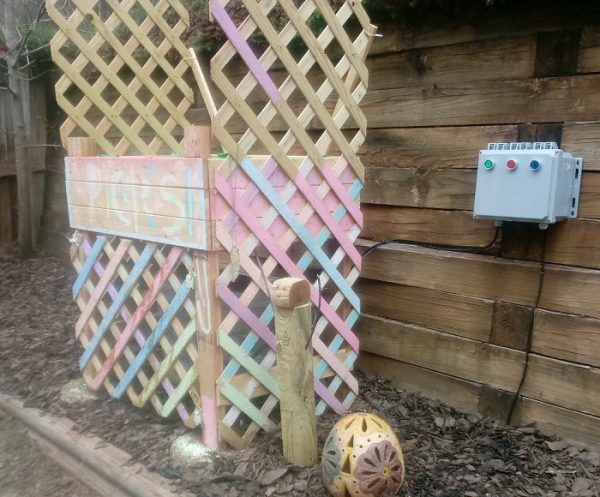
Seriously though, the CLICK PLC had the low price, stand-alone design and simple instructions we needed for this project. We also wanted some way to know if the water level in the reservoir was getting low, so we added a float switch and a few indicator lights as well. Here is the list of control components:
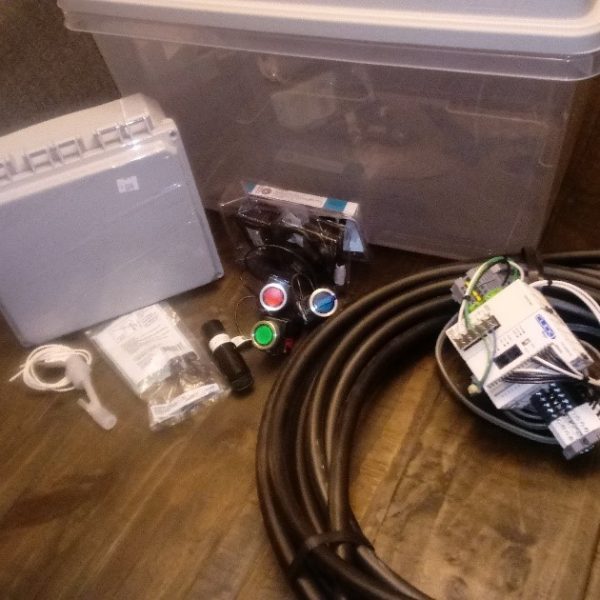
- Control panel: CLICK power supply (C0-01AC), CLICK CPU (C0-00AR-D), enclosure with subpanel, blue illuminated selector switch, red and green illuminated push buttons
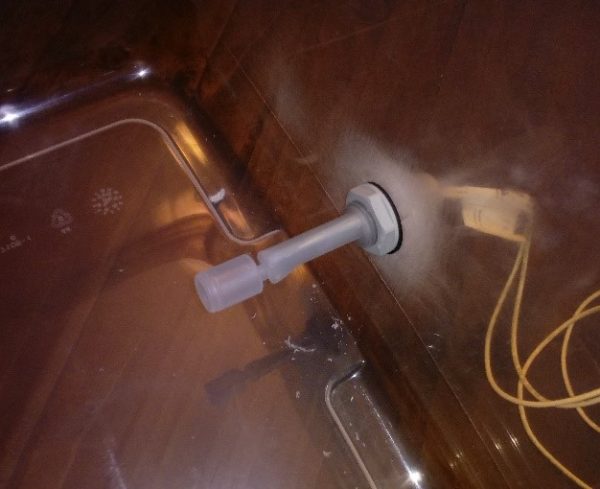
- Holding tank: 18-gallon storage bin with added drain plug and float switch
- Water delivery system: 120VAC fountain pump, drip irrigation tubing and three 1GPH button drippers
- Miscellaneous: DINnector terminal blocks, DIN rail, wire, power cord, cable glands, fuses
Putting it all together
The idea for this automated garden box is a simple one. Have the PLC turn on a pump to supply water to the plants for a selected amount of time, twice a day. Now understand that while I do have experience with PLC controls, I am in no way a gardener. It’s going to take a bit of trial and error on my part to make sure the plants are getting the correct amount of water, but I’m hopeful that I’ll get at least one edible cucumber this season.
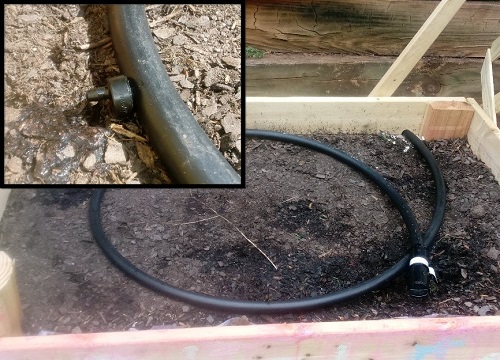
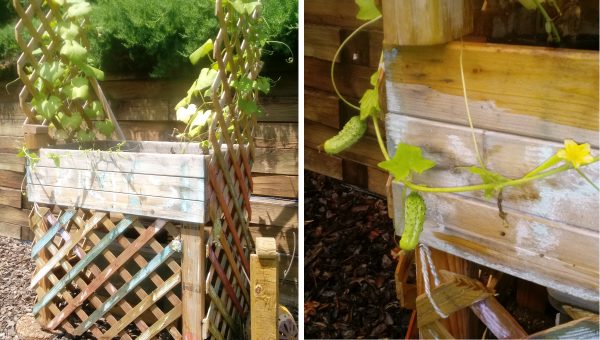
The water is fed from the 18-gallon reservoir under the garden box using the PLC-controlled fountain pump and irrigation tubing.

The tubing is routed into the garden box and around the cucumber plants with button drippers on the main line to supply a steady drip when activated.
A horizontal float switch is mounted to the tank at a height that will send the “tank low” signal with approximately 4 gallons left.
A green Start pushbutton is used to start the system, a red Pump Test pushbutton allows us to test the pump as needed, and the watering duration time is set with the blue selector switch. The pushbuttons and selector switch are illuminated versions and will light to display different system conditions i.e. Tank Low, System Start and Pump On.

Let’s code
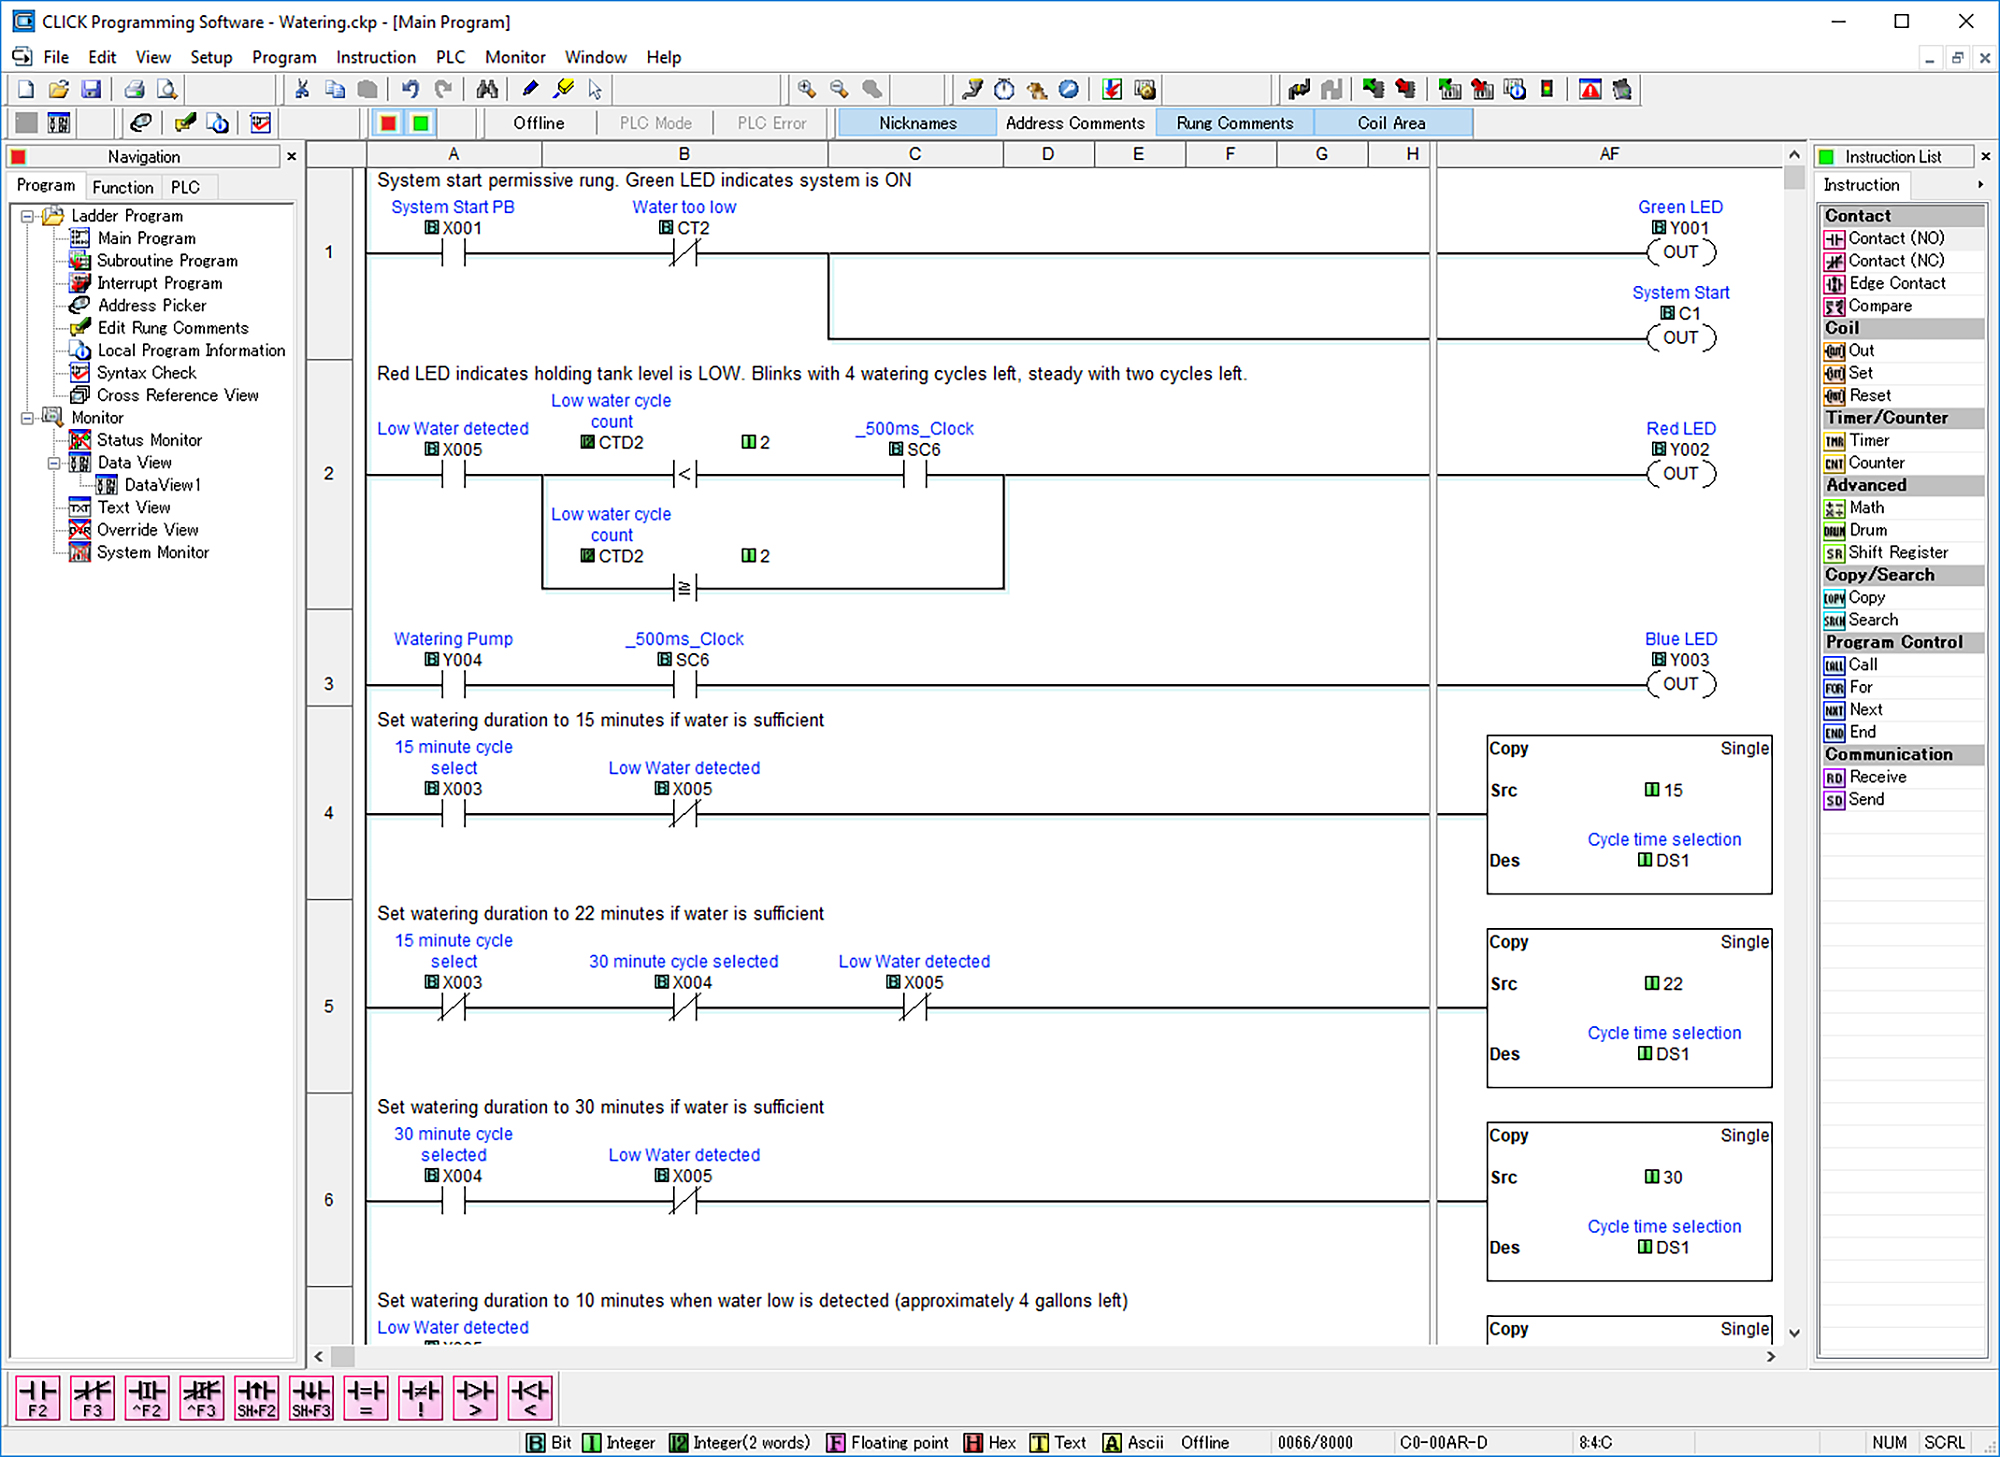
The sequence of operations for the watering section of the ladder program is as follows:
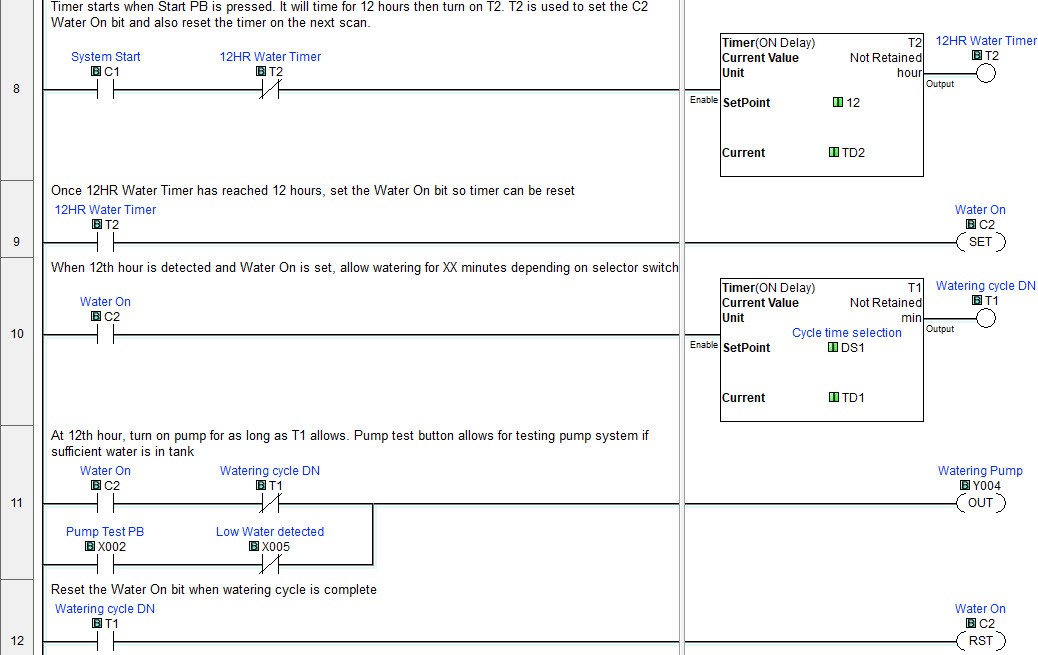
- Start an hour timer once the system is started
- On the 12th hour, activate the pump for the amount of time selected by the selector switch
- Deactivate pump and reset watering process once watering cycle is complete
- Repeat on every 12th hour
Rungs 8 through 12 (below) show how I chose to code this sequence. This particular CLICK CPU does not have a real-time clock where I could set the watering cycle for a particular time of day. However, I coded the PLC for two waterings a day, with 12 hours between them. This could be set for any number of waterings per day but I figured two would do.
When the system is started, a timer will start that has a setpoint of 12 hours (rung 8). At the 12th hour, the timer done bit will set the Water On bit (rung 9) and, on the next scan, toggle the enable leg of the 12-hour timer to reset it. The Water On bit (C2) is used in rungs 10 and 11 to turn on the pump output for as long as the Water Cycle timer allows (timer setpoint value is determined in rungs 4-7). Rung 11 also shows the Pump Test logic which allows a test of the pump when the pushbutton is pressed if there is sufficient water. Rung 12 will reset C2 and the Water Cycle timer once the watering is complete. This process will repeat every 12 hours as long as the System Start bit is active.
Rung 1 has the start permissive bits and controls the illumination of the Start pushbutton. For now, the only condition for the system to start is that the water be at an adequate level.

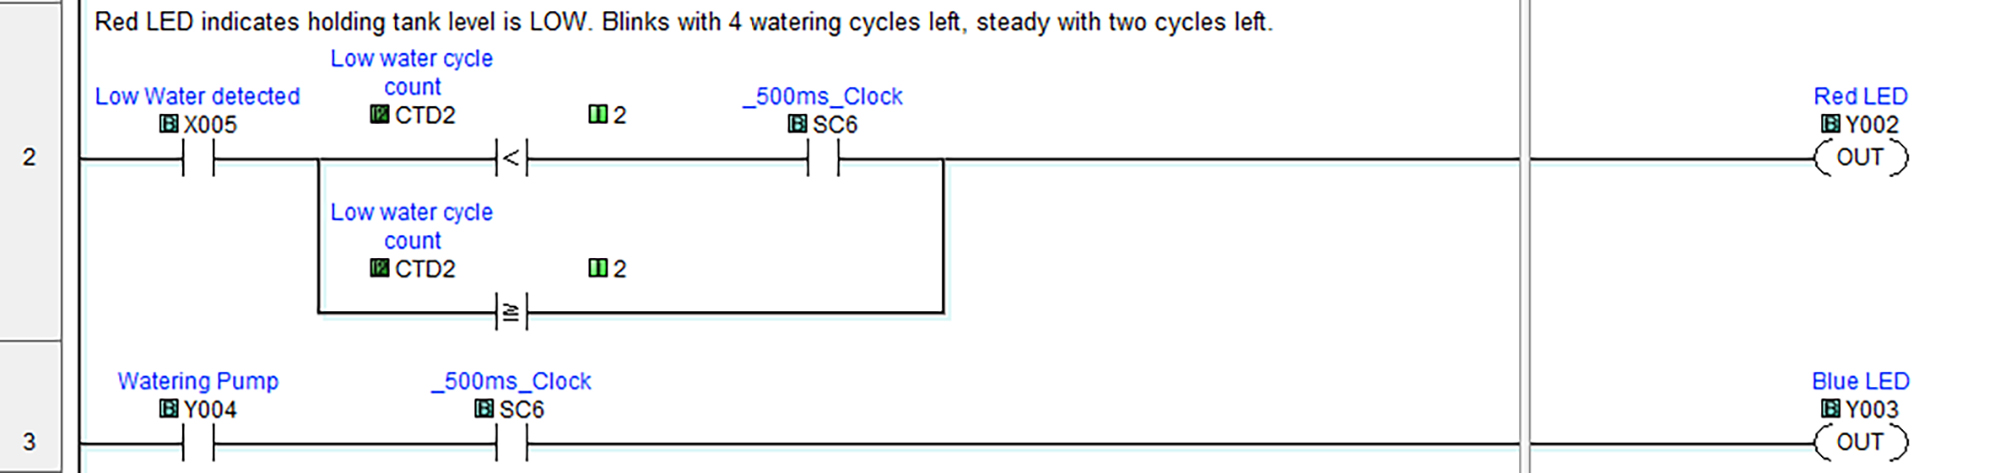
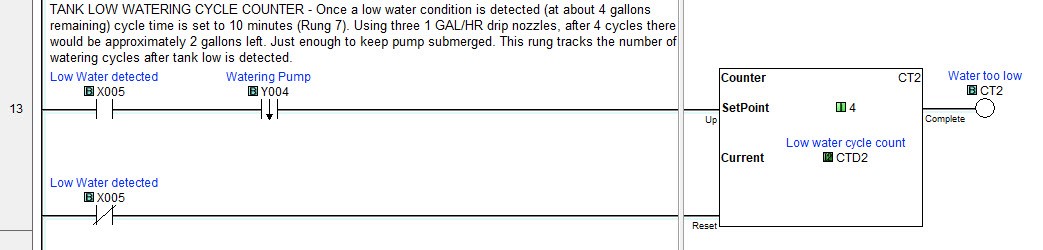
Rungs 2 and 3 control the red and blue indicator lights. The red LED will blink when water is at a low level (4 gallons remaining) and light steady when the system is within two cycles of a shutdown due to a Water Too Low condition (determined by rung 13). The blue LED blinks whenever the system is actively watering the plants.
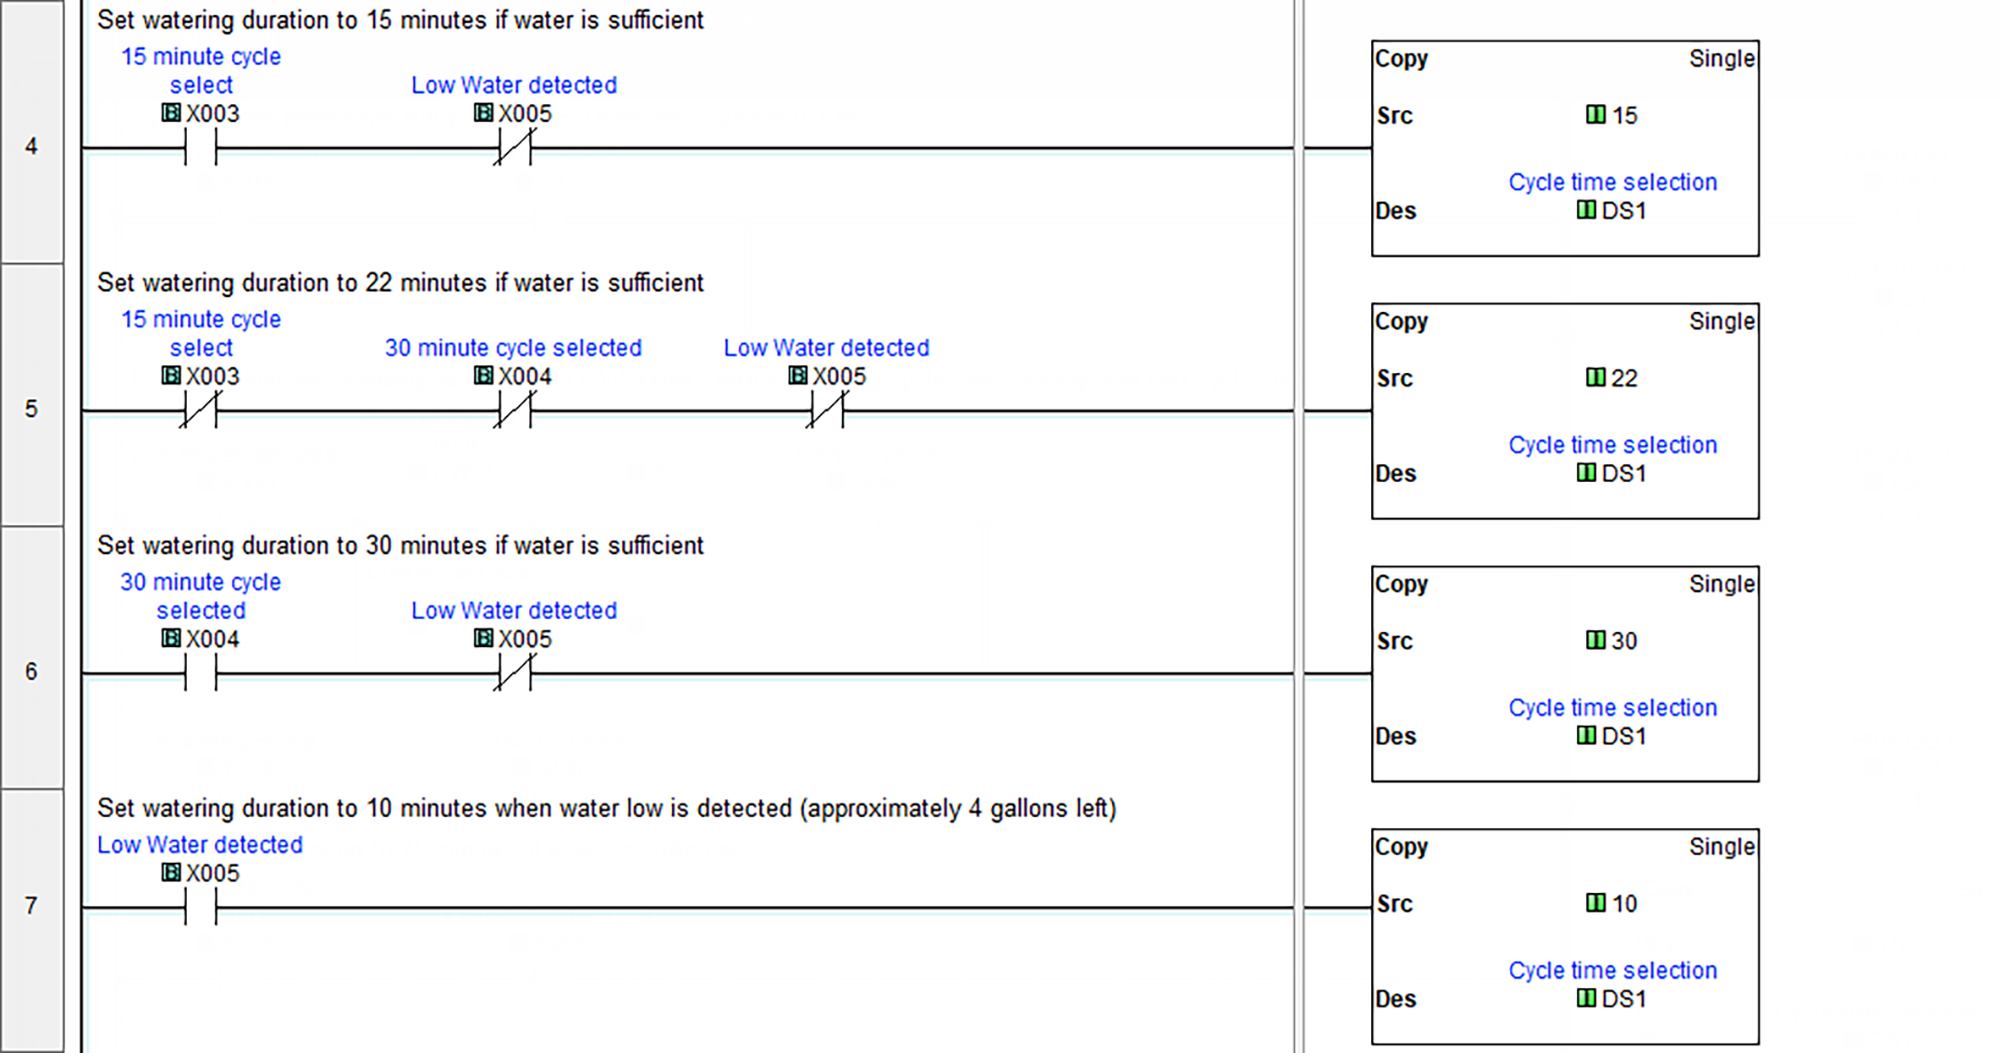
Rungs 4, 5 and 6 define a watering duration of 15, 22 or 30 minutes, depending on the position of the selector switch, and load that value into the preset for the Watering Cycle timer used in Rung 10. Rung 7 works similar to the previous rungs, but this rung sets the Watering Cycle timer preset to 10 minutes when the water low switch is detected, to ration what water is left.
Rung 13 is used to allow the system to continue watering the plants once the water low switch is active, but also ensures that at least two gallons remain in the tank at all times. Once the water level reaches the low state at approximately 4 gallons remaining, 4 watering cycles will be allowed at 10 minutes each. With three 1GAL/HR button drippers, 4 cycles at 10 minutes each would leave about 2 gallons left. After the fourth cycle has run, if the water in the reservoir has not been replenished, the system will shut down.
DIY PLC Project – The Verdict
CLICK’s instruction set is very straightforward and provides the right amount of simplicity for applications such as these. I didn’t need any complex motion profiles or cascaded PID loops, I just needed to turn on a pump for a little bit and then turn it back off. And although CLICK does offer more functionality than I needed, it provided the perfect amount of simple ON/OFF control for this project. Some things that I found particularly useful were:
- Easy-to-use function blocks – for many of them it’s just click the function you need
- Communication port auto detection – makes going online a cinch
- Data View window with overrides – for testing logic
- Convenient Address Picker with Nickname and In Use columns – great for choosing and naming elements
- System configuration with power budget info – I didn’t have to worry about power budgeting but I thought it was pretty cool that the CPU was tracking it for me
So, to answer the question “Are CLICK PLCs really that simple?” – yes, I personally think they are. The hardest thing on this project was keeping the tank watertight; the PLC installation and programming were a breeze. But you might be wondering, “Would I tell you otherwise?” After all, it’s my job to promote these PLCs. Well, for the sake of neutrality, here are a few things I didn’t like. As mentioned earlier, this particular CLICK CPU doesn’t have a real-time clock which would have allowed for greater functionality. Also, it has no battery backup which I predict will cause a headache after being powered down in the winter, and there wasn’t a project simulator so I could test the code inside on rainy days. But these issues were nuisances and things I could easily do without at this price range. By the way, if I would have spent just a little bit more I could have gotten a CLICK CPU with the clock and battery backup – just saying.
Overall, I’m highly pleased with the system. It was the perfect introduction to automation for my son and we’re hoping for a great cucumber harvest. Future improvements are already being discussed, including adding a rain collection apparatus to the tank, closing the loop with a soil moisture detector, and possibly critter deterrent with a few photoeyes and a horn of some kind – my neighbors are going to love that one 😊.
UPDATE (6/28/18):
The system is working great. I did have to increase the amount of water cycles from two per day to three per day. I did that by simply changing the hour timer (T2) preset to 8 instead of 12 in rung 8 of the code above. As far as the cucumbers go, apparently we aren’t the only ones who enjoy them. The local insect population chowed down pretty hard but I managed to get them under control and now everything seems to be going well…
All AutomationDirect content and associated training supplies provided in connection therewith (the “Materials”), are supplied “as is”. These Materials are provided by our associates to assist others in learning the products we sell and service. We make no representation, warranty or guaranty, whether expressed, implied or statutory, regarding the Materials, including without limitation, implied warranties of merchantability or fitness for a particular purpose. We make no representation, warranty or guaranty that the Materials will be accurate, complete, uninterrupted, error free or non-infringing, or are suitable for your particular application, nor do we assume any responsibility for the use of this information in your application. Copyright © 2018 automationdirect.com